User Manuals:

This page provides an overview of how to safely install, operate, and maintain your Blingmatix Rhinestone Setting Machine. For technical questions, please contact our remote support team.
Quick Navigation
- 1. Safety Precautions
- 2. Installation
- 3. Machine Overview & Part Names
- 4. Main Components
- 5. Operation
- 6. Things to Know Before Operating
- 7. Cleaning & Maintenance
- 8. Troubleshooting
- 9. Specifications
- 10. Warranty
1. Safety Precautions
Read these precautions carefully before installing or operating the machine. Keep this guide accessible to all operators.
Before Use
- Do not disassemble or modify this product. Electric shock and safety accidents may occur.
- Be careful not to let the laser come into direct contact with your eyes. Eyes may be damaged.
- Use this product only with the specified power supply (AC 220V 50/60Hz, or 110–120V AC if equipped for that standard).
- Do not bend the power cord forcibly or damage it by being pressed by a heavy object.
Transportation
- Before transporting, remove any contents and unplug the power plug.
- Secure the worktable and feeder holder by tying them with string or tape (shown above).
- Protect the machine from shock and moisture during transport.
- Move the product with at least two people. If using a forklift or lift truck, keep the center of gravity level. The machine weighs 230 kg / 507 lbs.
Selecting an Installation Location

Dimensions: 1100 × 900 × 1160 mm (43 × 35 × 45 inch H) · Weight: 230 kg / 507 lbs · Plan enough space around the machine for operator access on all sides.
- Do not install in a humid, watery, or dusty place.
- Avoid high temperature, direct sunlight, extremely cold environments, or proximity to heaters.
- Maintain ambient temperature of 20–30 °C / 68–86 °F.
- Choose a well-ventilated, low-humidity location with a grounded outlet.
- Indoor use only. Leave enough space around the machine for your work.
Safety Rules

- Do not open the front door during operation.
- Keep hands clear during operation.
- Do not open the cover without qualified personnel.
- Wiring work shall be carried out only by qualified personnel; otherwise, there is risk of electric shock and/or fire.
Emergency Button

In case of emergency, press the emergency button on the front panel. The power will switch off and the machine will stop. To restart:
- Turn off the main power switch.
- Eliminate the emergency factor.
- Release the emergency button by turning it clockwise.
Door Sensor

The door sensor ensures that the machine only operates when the front door is closed. This protects operators and reduces noise.
2. Installation
Step 1 — Position and Lock the Wheels

After positioning the machine, turn the red handle on each wheel to lock it in place.
Step 2 — Install the Signal Tower
Insert the signal tower into the mount, tighten the two bolts, connect the cable, and push the cable inside.

Insert |

Tighten the 2 bolts |

Cable connection |

Push cable inside |
Step 3 — Install the Monitor and Feeder Stand
Tighten the four bolts on the monitor arm, connect the code cable, and install the feeder stand.

Tighten the 4 bolts |

Code connection |

Install a feeder stand |
Step 4 — Machine Test
Plug in the power cord, switch power ON, and run a warm-up test from the monitor.

Plug in a power cord |

Power on |

Warm up test |
3. Machine Overview & Part Names
The Blingmatix machine consists of the following labeled components:

- Monitor — Displays design load, edit, save, work status, alarms, control panel, and machine check functions.
- Emergency button
- Power switch
- USB socket
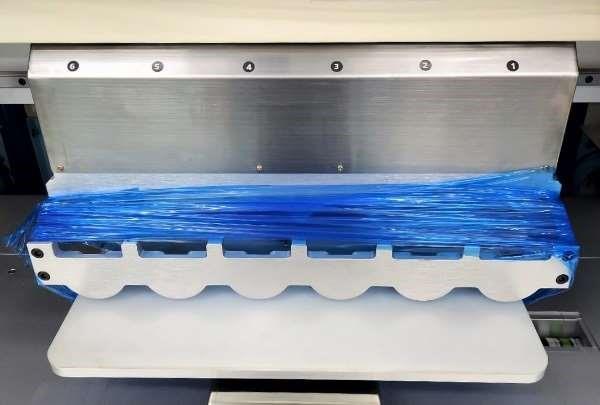
- Feeder — Holds rhinestones, MC stones, studs, etc.
- Feeder holder — Where you place the feeders to work.
- Feeder stand
- Signal tower — Green when running, red when stopped.
- Sensor amplifier
- Door — If the door sensor is set to YES, the machine only operates when the door is closed.
- Worktable — 400 × 400 mm / 16″ × 16″ working area.
- Cabinet
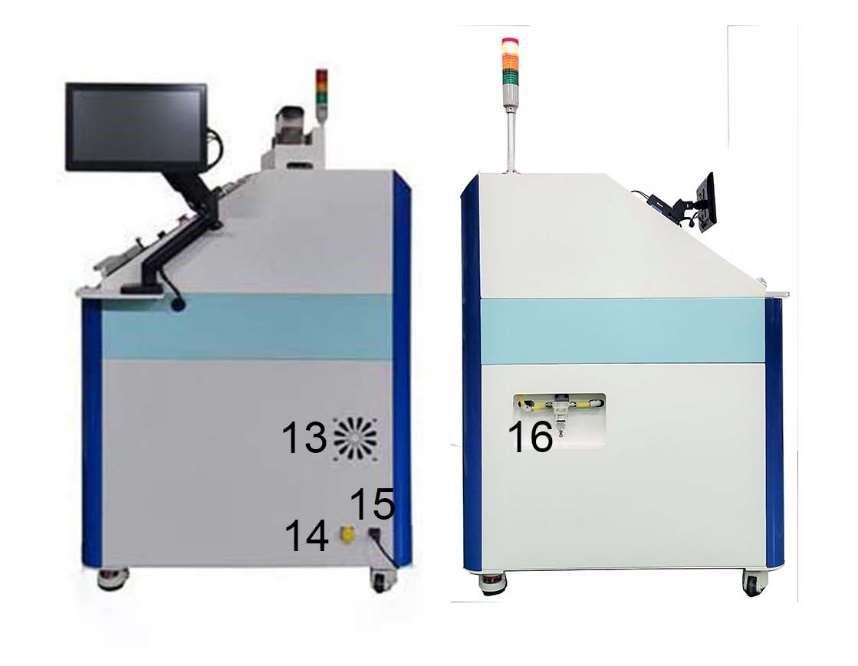
- Fan cooler
- LAN socket — For remote support and machine status monitoring.
- Power cord socket
- Air filter
4. Main Components
Sensor Amplifier
The sensor amplifier is set to a standard value of 50 (shown as a green number). When the power is on, the amplifier displays this baseline.

When you fill a feeder with stones and place it in the feeder holder, the red number should drop below 50 for normal operation. If the red number stays at or above 50, check for clogged sensor holes (see the Cleaning section).

Feeder
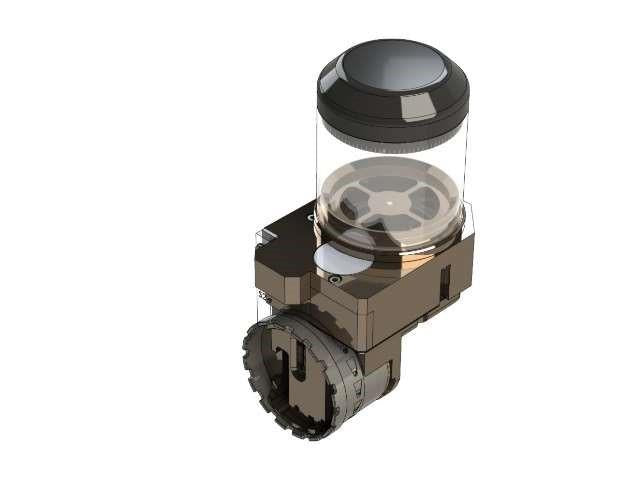
The feeder is a supply device that holds stones or studs in a transparent plastic container. If the stone or stud width or height exceeds the tolerance range of the feeder, parts may need to be replaced.
Standard stone feeder sizes:
| Size | SS6 | SS10 | SS16 | SS20 |
|---|---|---|---|---|
| Diameter | 2 mm | 3 mm | 4 mm | 5 mm |
| Compatible with | MC stones, Rhinestones, Studs | |||
Special stone feeder sizes:
| Size | SS4 | SS8 | SS12 |
|---|---|---|---|
| Diameter | 1.5 mm | 2.5 mm | 3.5 mm |
| Compatible with | MC stones, Rhinestones | ||
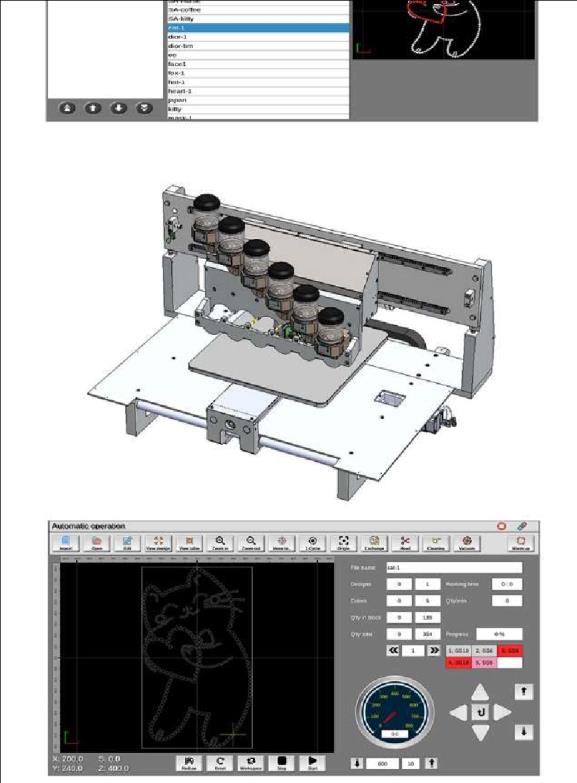
5. Operation

- In the design program, save your design to a USB drive as a
.blufile. - Plug the USB drive into the machine's USB socket.
- Select your design on the monitor.
- Place the feeders in the correct order on the feeder holder.
- Press Start.
6. Things to Know Before Operating
- Poor-quality stones — those with foreign substances, cracks, or drops of bond — can cause clogging or jamming of the feeder.
- For best results, work at 20–28 °C and avoid high humidity.
- Use the correct feeder type and size. Mixing sizes in one feeder may cause failure.
- Always operate safely. Do not touch the power plug with wet hands.
- Keep the machine away from fire and flammable substances (benzene, thinner, alcohol, ether, LP gas, cosmetics).
- Do not place liquid containers or heavy objects on top of the product.
- If the product smokes or smells of burning, unplug it immediately and contact support.
- Do not spray water on the product, and do not wipe with benzene, thinner, or similar solvents.
- Do not apply excessive force or impact.
- Do not disassemble, repair, or modify the machine except through a qualified service engineer.
- After turning on the power, wait approximately 10 seconds for the initial drive to complete before operating the monitor.
- When restarting, wait until all motion has fully stopped before turning power back on.
7. Cleaning & Maintenance
Machine Surface
Turn off the power and unplug the power cord. Wipe the surface gently with a soft cloth dampened in lukewarm water or mild detergent, then dry thoroughly so no moisture remains. With the power off, move the worktable slightly to clean remaining areas underneath. Do not use organic solvents (alcohol) or chlorine-based cleaners — these may cause deformation or malfunction.
Air Filter

1. If more than 30% of the transparent bottle is filled with debris, clean it. |

2. Remove the top of the transparent bottle by turning it counterclockwise. |

3. Remove any debris from the upper fastening area with a brush or cloth. |

4. Remove the parts from the transparent bottle and clear residue using compressed air, a brush, or cloth. |

5. Remove the black cover by turning it counterclockwise, then clean any scraps. |

6. Reassemble in the original order and turn clockwise to lock back in place. |
Vacuum Hose
If the air from the docking head feels weak:

1. Remove the tube while pressing the connector. |

2. Clean inside the line using an air gun. |
Feeder
Clean the nozzle and sensor holes using the feeder hole cleaner if they become clogged.

Clean the nozzle |

Clean the sensor hole |
Sensors on Docking Head
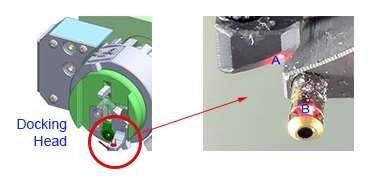
When the red number on the sensor amplifier is significantly lower than expected at power-on, wipe parts A and B of the docking head with a soft cloth.
8. Troubleshooting
If you experience any of these symptoms, please check the corresponding items before contacting support.
| Symptom | Cause & Solution |
|---|---|
| Wind leaking out and stones pouring out | Docking is incorrect. Press Stop, remove the feeder, and reinsert it. |
| 2–3 stones missing at the start of feeder operation | Normal for a freshly filled feeder. Hold the transparent barrel in your left hand and the feeder drum in your right; rotate the drum toward your body two or three times to drop initial stones. Be careful of rotation direction. |
| Stones missing here and there during setting | Sensor and nozzle holes are blocked. Remove foreign substances from the nozzle and sensor holes. |
| Other feeder problems | Refer to the feeder section above, or contact remote support. |
| Hotfix tape will not fix at the start | If the worktable is too dry, the air from the docking head can make the tape flap. Lightly spray water on the worktable. |
| No power on | Confirm the power plug is fully connected. Some electronic components may have been unplugged during transportation — check internal connections. |
| Pressing START does not work | If the door sensor is set to YES and the door is open, START will not engage. Close the door, or set the door sensor to NO (use caution). |
| Stones don't stick well to the hotfix tape | Run a stone-setting test on a worktable without hotfix tape. If setting is normal, the feeder is fine. Possible causes: poor post-processing of stones, foreign substances, or low temperature. Store stones and operate at 20–26 °C. |
| Air is weak | Press the air cleaning button on the monitor. If still weak, clean the vacuum hose as described in the Cleaning section. |
9. Specifications
| Speed | Max. 600 stones / minute |
|---|---|
| Power | Single phase AC 220V 50/60Hz 500W (110–120 V AC available on request) |
| Monitor | 13.3 inch HD Touch Screen |
| USB | USB 3.0 |
| SD Memory | 64 GB Micro SD (60 GB data memory + 4 GB system) |
| Ethernet | 1000 Mbps (Remote Support) |
| Capacity | Stone Sizes SS6 – SS20 (2 mm – 5 mm); Max. 6 Colors in one design |
| Standard Accessories | Feeder stand, Maintenance tools, Stone feeders, Design Software |
| Optional Accessories | Extra stone feeders |
| Dimensions | 1100 × 900 × 1160 mm / 43 × 35 × 45 inch (H) |
| Weight | 230 kg / 507 lbs |
| Working Area | 400 × 400 mm / 16″ × 16″ |
10. Warranty
Every Blingmatix Rhinestone Setting Machine includes a 1-year limited factory warranty covering defects in materials and workmanship under normal use. For full terms — including what is covered, exclusions, and how to make a claim — please review the Warranty & Customer Support Agreement.
For repair requests, please contact our remote support team with your machine's serial number, date of purchase, and a description of the issue. Photos or short videos help us diagnose faster.
Need help? Our remote support team is available by video call and phone. Contact Support.